Frequently Asked Questions
Category

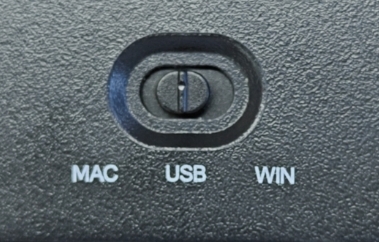
All our wireless keyboards have a switch to control the internal battery power supply.
- For most plastic case keyboards, the switch is located on the bottom of the keyboard. Typically, the OFF or USB setting turns off the power, while the Mac/Win/ON setting turns it on.
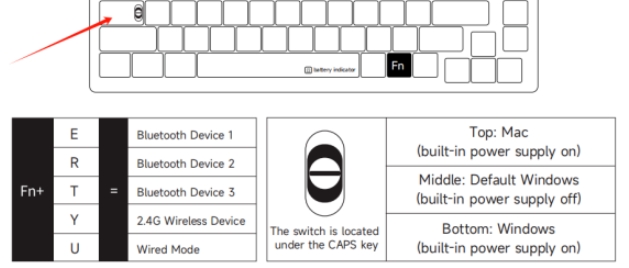
- If you don’t find the switch at the bottom, it should be under the Caps Lock key. Usually, the middle position turns off the power, while the up and down positions turn it on. This applies to all M series wireless keyboards.
To enable wireless mode, please toggle the switch located on the bottom case or under the Caps Lock key to turn on the power supply. This should activate the keyboard for wireless use.
If you are experiencing issues with the SOLID_REACTIVE_SIMPLE lighting effect on your M1 QMK or M1 QMK v3, where the key to the left lights up instead of the intended key, please flash the firmware using the link below:
Make sure to follow the firmware flashing instructions provided to resolve the lighting issue. Please note that this firmware can only be used on M1 QMK or M1 QMK v3.
1. Download QMK Toolbox: If prompted, proceed with the installation process and wait for it to complete.
2. Open QMK Toolbox: Launch the QMK Toolbox software on your computer. If it’s your first time using it, you may be prompted to install the necessary drivers. Follow the on-screen instructions and wait until the installation is finished.
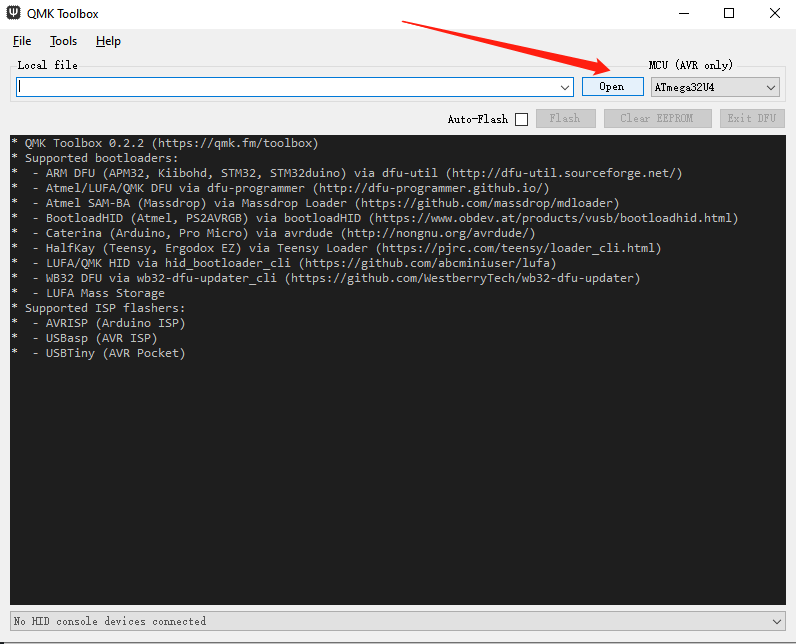
3. Locate the firmware: Click the “Open” button in the QMK Toolbox to browse and select the appropriate .bin firmware file for your keyboard model. Ensure you have downloaded the correct firmware version for your keyboard.
4. Enter Bootloader mode: Disconnect the USB cable from your keyboard. While holding down the “ESC” key, reconnect the USB cable. You should notice the “Flash/Exit DFU” button in the QMK Toolbox turn black, indicating that you are now in Bootloader mode.
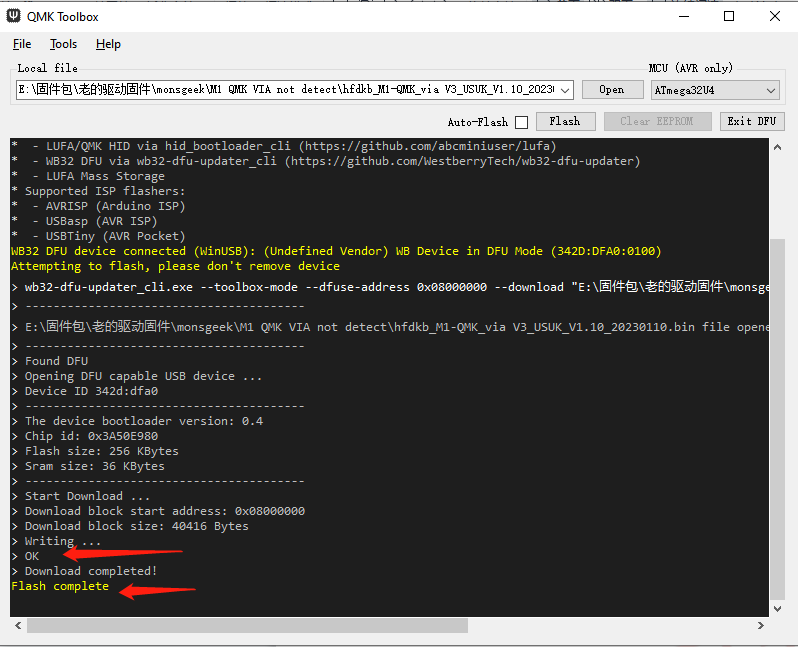
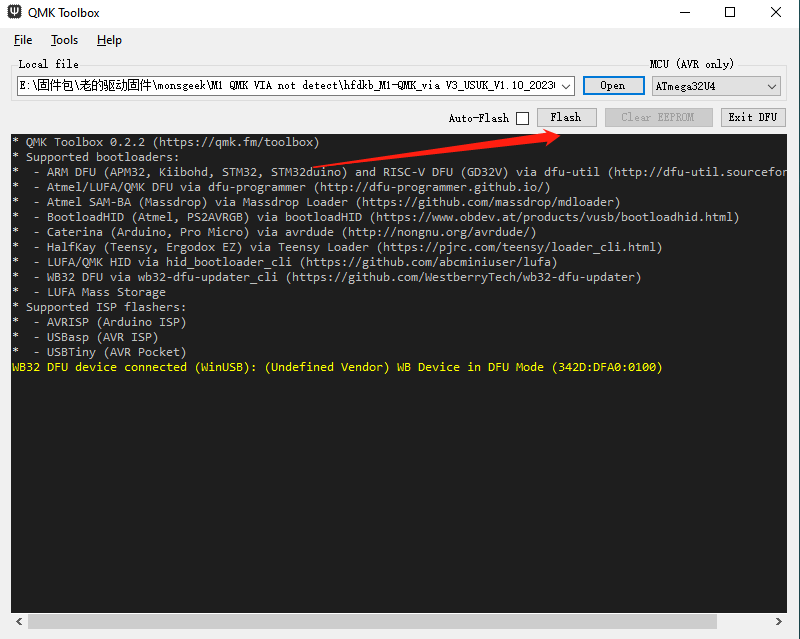
5. Flash the firmware: With your keyboard in Bootloader mode, click the “Flash” button in the QMK Toolbox to begin the firmware flashing process. Wait until you see the “OK” message indicating that the firmware update is complete.
6. Exit Bootloader mode: After the firmware has been successfully flashed, click the “Exit DFU” button in the QMK Toolbox. You can then close the QMK Toolbox software.
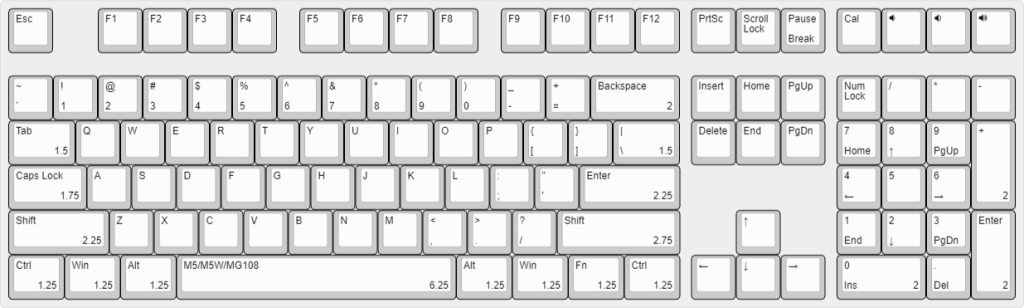
The keycap sizes of MonsGeek M5/M5W/MG108 are as below. The remaining unlabeled keycaps are 1U.
The keycap sizes of MonsGeek M3/M3W are as below. The remaining unlabeled keycaps are 1U.

The keycap sizes of MonsGeek M2/M2W are as below. The remaining unlabeled keycaps are 1U.
Starting at $69.99, the MonsGeek M1 v3 is designed for enthusiasts, offering accessibility across the globe with more vivid color choices and comprehensive upgrades inside and out.
Knob:
The knob has been upgraded with a new encoder and a levitating structure to prevent scratches against the case, addressing issues reported in the previous version.
Internal (for M1 V3 QMK Series):
The noise reduction system has undergone a full-fledged upgrade, including an additional PET layer attached to the top of the PCB and a thicker top Poron case foam (with socket cut-outs) integrated with another PET layer for better sound locking and noise reduction.
Simplicity:
By removing the side accent, consistent support from MonsGeek fans has allowed us to balance costs further and focus on delivering an enthusiast-level keyboard at a reasonable price.
For more information, please check here.
Make sure that your keyboard is M5W before you flash this firmware. Please follow these steps to update the firmware and potentially resolve the issue:
- Download Firmware: Download the new firmware from the provided link. Ensure you download all the files included in the link: Firmware Download.
- Run Firmware Tool: Execute the “royuan_tool.exe” file to open the firmware upgrade tool.
- Initiate Firmware Update: Press the “Upgrade” button on the upgrade screen to start the firmware update process.
Note: The firmware can only be updated in wired mode. Follow these steps:
- Toggle the system switch under the Capslock key to the middle position.
- Press Fn+U to enter wired mode.
- Flash the firmware from the link (do not update through the Driver).
- If the update fails, try re-plugging the keyboard and updating again. Avoid opening the MonsGeek driver and operating the keyboard during the update process.
Please keep in mind that firmware updates should be performed with caution and only when necessary. If your keyboard is working properly and recognized consistently, there may not be a need to flash the firmware.
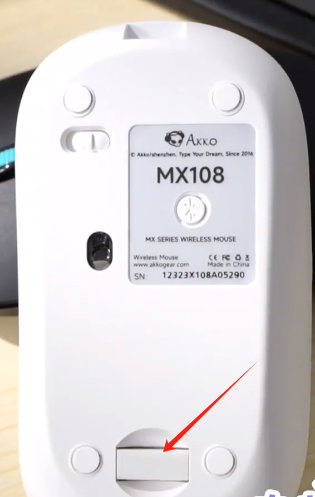
The MX108 keyboard shares its receiver with the mouse. You can locate the 2.4G receiver at the bottom of the mouse, as shown in the image below.
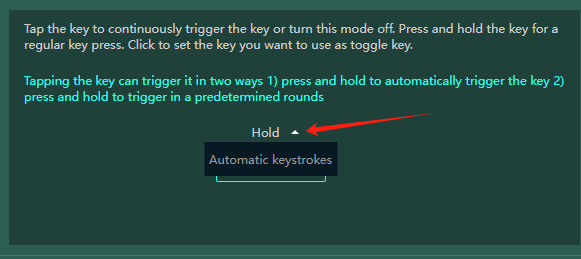
TGL, or Toggle Key, transforms a key into a toggle switch. When you press this switch, you can activate one of two scenarios: either continuously hold down the key/function, or trigger the key/function multiple times at a set frequency (similar to high-frequency tapping).

To set up TGL:
- Select the key you wish to program.
- In the “Combination” and “Macro” fields on the left, define the key combinations or macros you want to activate when pressing or holding down the key.
- Press “confirm” to complete the setup.

You can click on the little triangle to toggle Hold and Automatic keystrokes.
Mod-Tap is a feature designed to enhance convenience for both gaming and productivity tasks. With Mod-Tap, a single keypress can trigger two functions: holding down the key for one action and pressing the key for another. It allows users to create dedicated or dual-functional keys based on their keypress behavior. This feature is particularly useful for compact keyboards, enabling efficient key combinations such as long-pressing the ESC key to output ~ or accessing the task manager with a specific key combination (Alt+Ctrl+Delete).
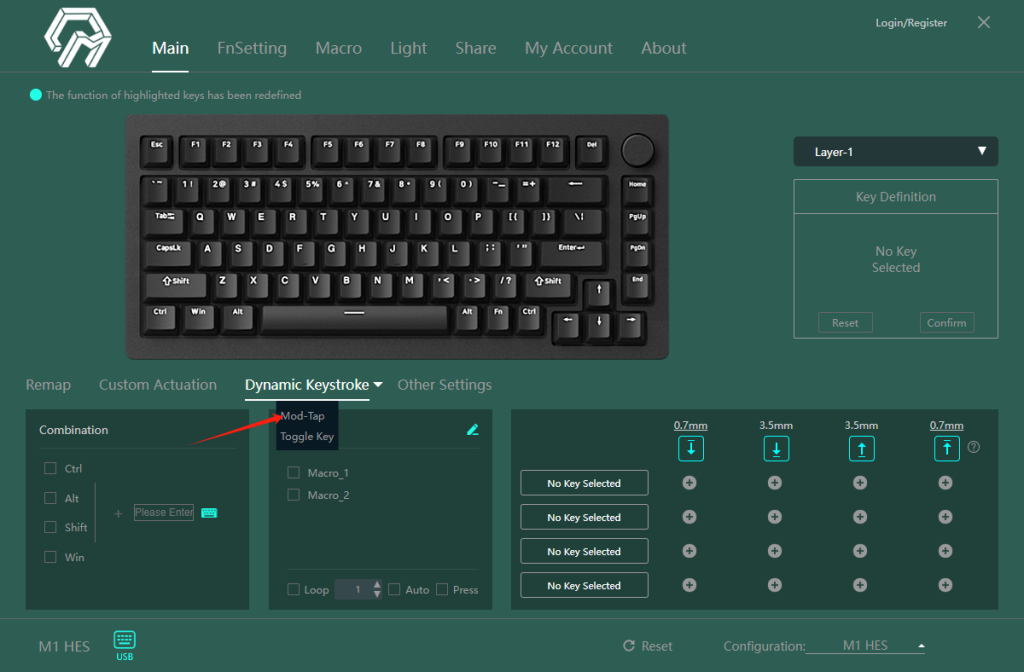
To set up Mod-Tap:
1. Select the key you want to set and the “Hold and Press” option box will light up.
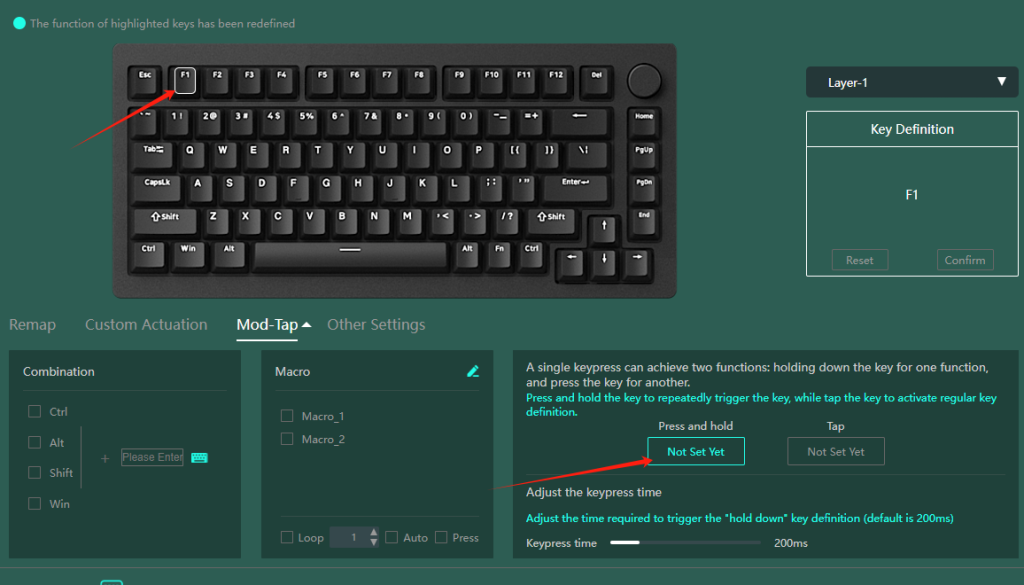
2. In the “Combination” and “Macro” fields on the left, define the key combinations or macros you want to activate when holding down the key.

3. Click “Confirm” to apply the settings for the Hold key. This allows you to activate Task Manager directly by holding F1.
4. You can set up Tap keys in a similar manner or leave them unchanged.
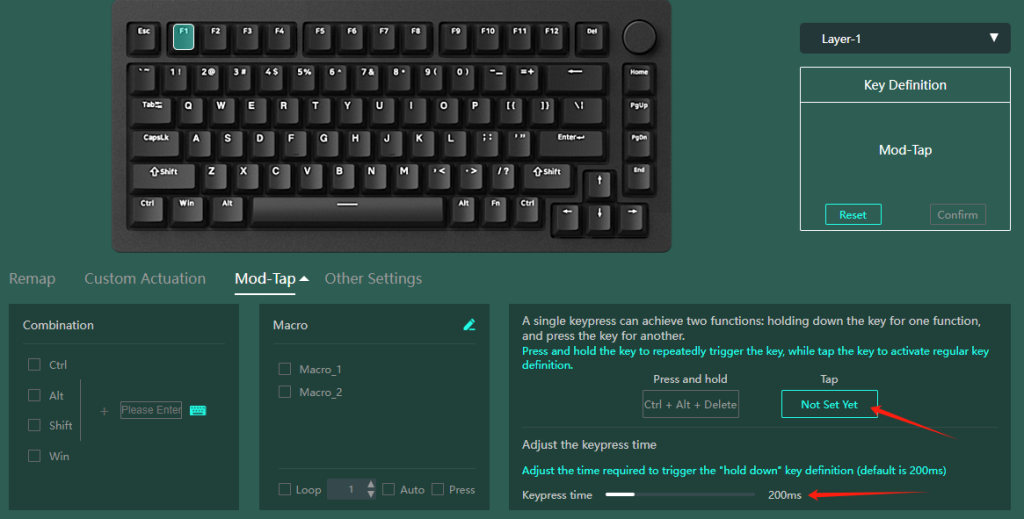
5. Adjust the keypress time using the slider at the bottom to customize the time required to trigger the “hold down” key definition (default is 200ms).
Please try to flash the latest firmware: M5 QMK firmware.
You can follow the steps below:
1. Download QMK Toolbox: If prompted, proceed with the installation process and wait for it to complete.
2. Open QMK Toolbox: Launch the QMK Toolbox software on your computer. If it’s your first time using it, you may be prompted to install the necessary drivers. Follow the on-screen instructions and wait until the installation is finished.
3. Locate the firmware: Click the “Open” button in the QMK Toolbox to browse and select the appropriate .bin firmware file for your keyboard model. Ensure you have downloaded the correct firmware version for your keyboard.
4. Enter Bootloader mode: Disconnect the USB cable from your keyboard. While holding down the “ESC” key, reconnect the USB cable. You should notice the “Flash/Exit DFU” button in the QMK Toolbox turn black, indicating that you are now in Bootloader mode.
5. Flash the firmware: With your keyboard in Bootloader mode, click the “Flash” button in the QMK Toolbox to begin the firmware flashing process. Wait until you see the “OK” message indicating that the firmware update is complete.
6. Exit Bootloader mode: After the firmware has been successfully flashed, click the “Exit DFU” button in the QMK Toolbox. You can then close the QMK Toolbox software.
Try online VIA: https://via.evove.top/ or https://usevia.app/
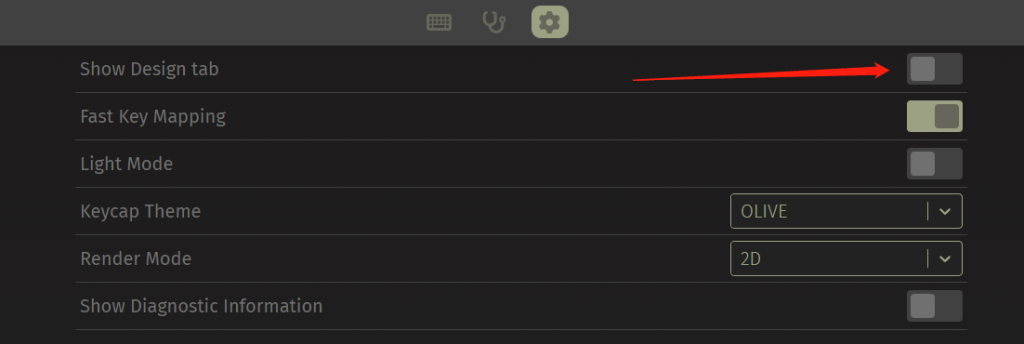
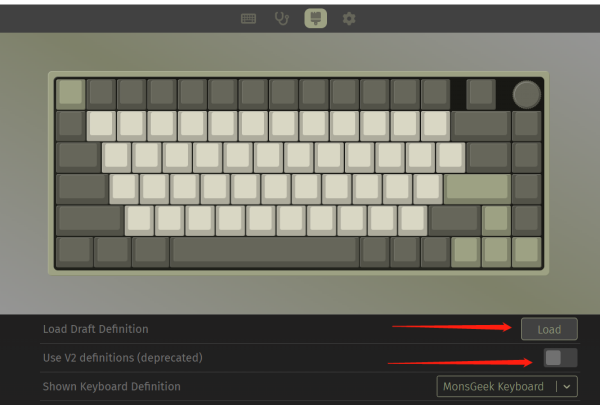
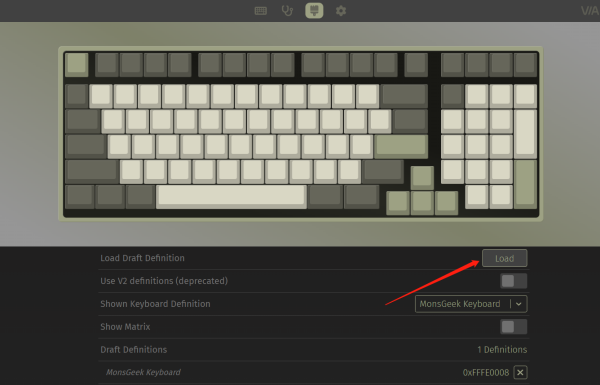
- Please use the right V3 .JSON file for the M3 QMK without needing to toggle V2 definitions. Here is the link: M7 V3.json (Right-click on the link and choose the option “Save Link As” to download the file.)If you cannot find the load button, make sure you have opened the Design tab as shown above.
- Load V3 JSON File: Load the corresponding V3 JSON file for your QMK keyboard. Ensure that the “Use V2 definitions” option is turned off when loading the V3 JSON file. You may need to load 2-3 times to let your keyboard be detected.
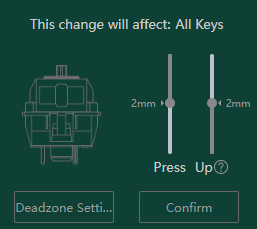
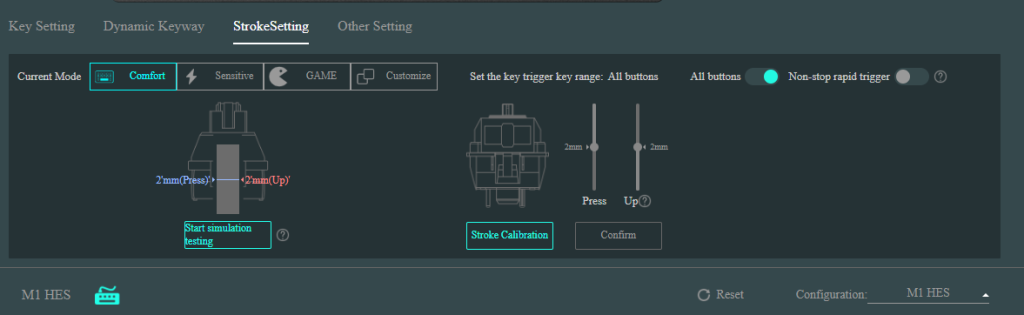
MonsGeek offers four distinct stroke settings, each tailored to different preferences and applications:
Comfort Mode: This mode closely mirrors traditional mechanical switches, featuring a 2mm actuation point and a 2mm reset point. It’s ideal for standard typing and work tasks.
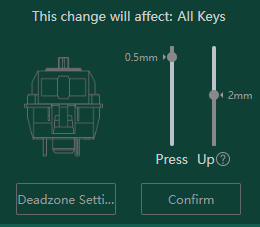
Sensitive Mode: In this mode, the actuation point is reduced to 0.5mm while the reset point remains at 2mm. It’s designed for users who require fast key triggers and responses.
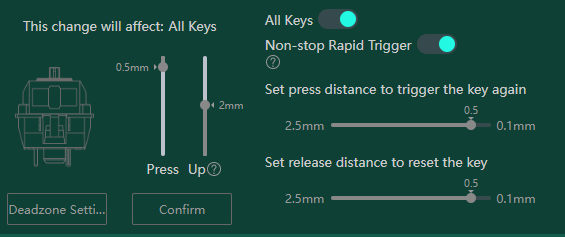
Game Mode: Game Mode unleashes the power of Rapid Trigger (RT). Here, the fixed actuation and reset points are eliminated, allowing switches to respond instantly to even the slightest pressure changes. It’s perfect for gamers seeking utmost responsiveness.
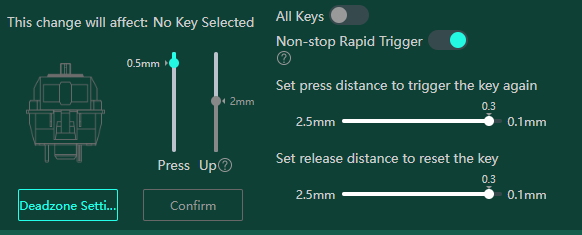
Customize Mode: In Customize Mode, you can modify the behavior of any key to suit your preferences. This mode offers a high degree of personalization, allowing you to tailor the keyboard to your specific needs and workflow.
To adjust the actuation and reset points:
Use the left slider to adjust the actuation point (Press) and the right slider to adjust the reset point (Up).
Enable “All keys” to apply your settings to all keys, or select specific keys for individual adjustments.
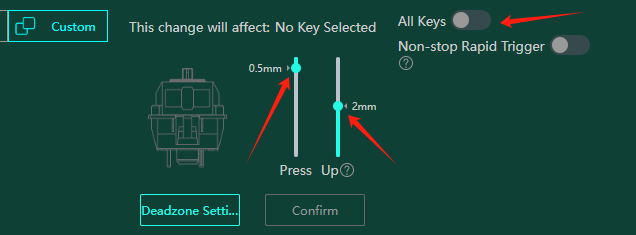
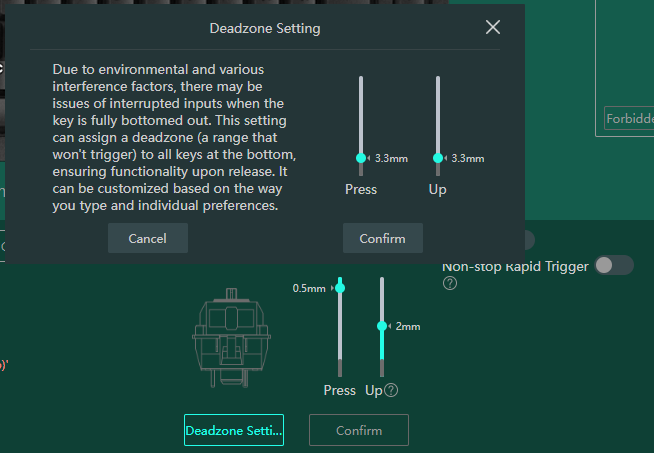
Due to environmental factors and potential interference, there might be instances of input interruption when keys are fully bottomed out. To address this, we’ve introduced a dead zone setting, which designates a range at the bottom of each key that will not be triggered, ensuring functionality upon release.
Turn on “Non-stop Rapid Trigger” to activate the RT function (in this mode, the reset point is replaced by the release distance and cannot be adjusted).
With RT enabled, switches respond to even slight pressure changes within the actuation range. You can set the press distance to trigger the key and the release distance to reset it in the additional menu that appears after RT activation.
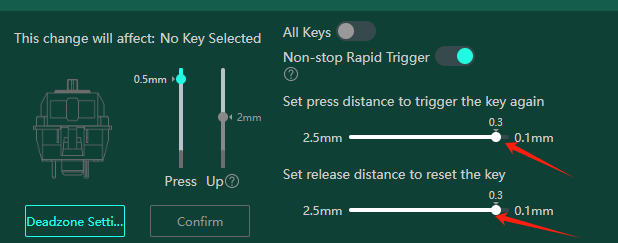
Note: While a 0.1mm option is available, to prevent accidental triggers or loss of contact due to slight movements, it’s advisable to set press/release distances no lower than 0.3mm as shown in the illustration above. If you experience frequent loss of contact, increase the release distance. If you encounter accidental triggers, increase the press distance.
In conclusion, unless you have specific requirements, Game Mode should suffice for most gaming scenarios, while Comfort Mode is highly recommended for office work and typing tasks.
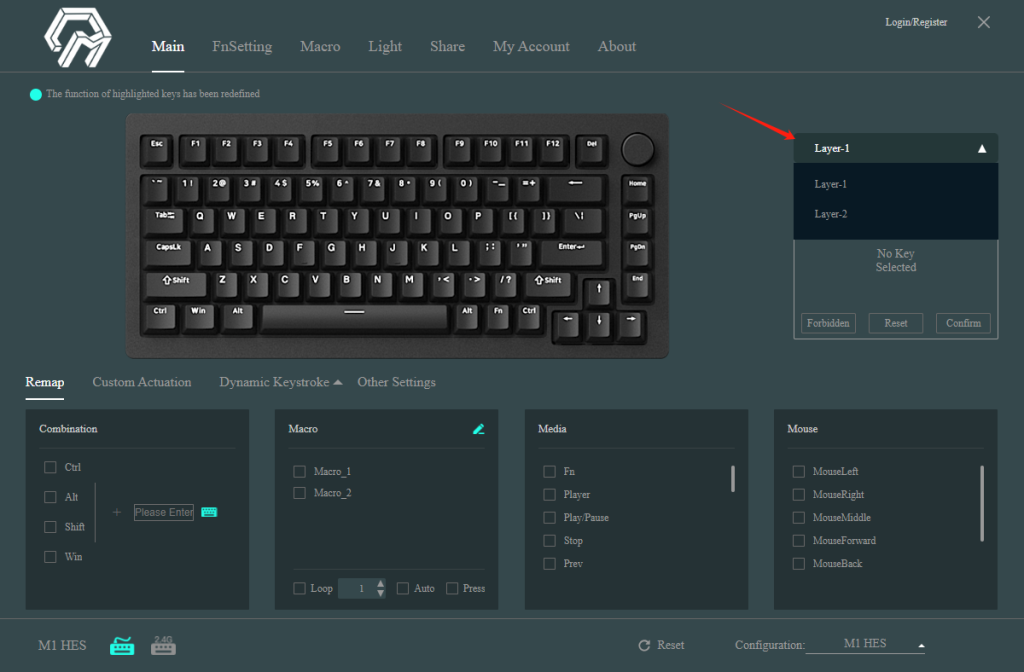
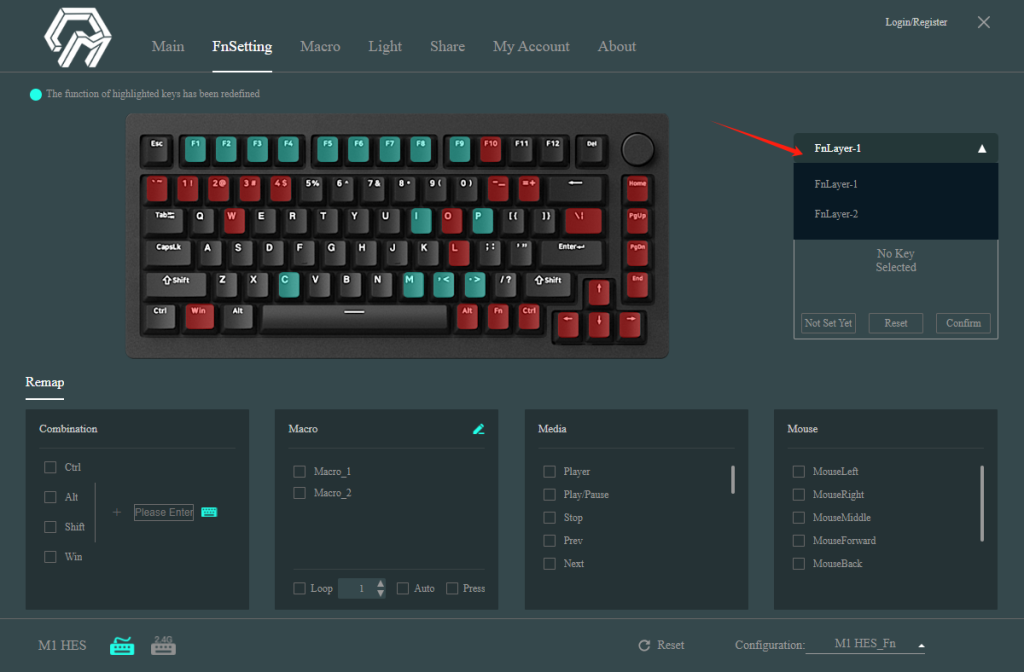
75% MonsGeek HE keyboards come with 2 normal layers and 2 Fn layers. You can adjust these layers using either the MonsGeek Driver or through hotkeys.
1. Use Fn+F9/F10 to switch to normal layer 1/2 respectively. Hold Fn and press right Alt to switch below Fn layer 1 and Fn layer 2.
2. Alternatively, you can directly modify the normal layers in the Driver Main-Remap Page, and adjust the Fn layers in the Fnsetting Page.
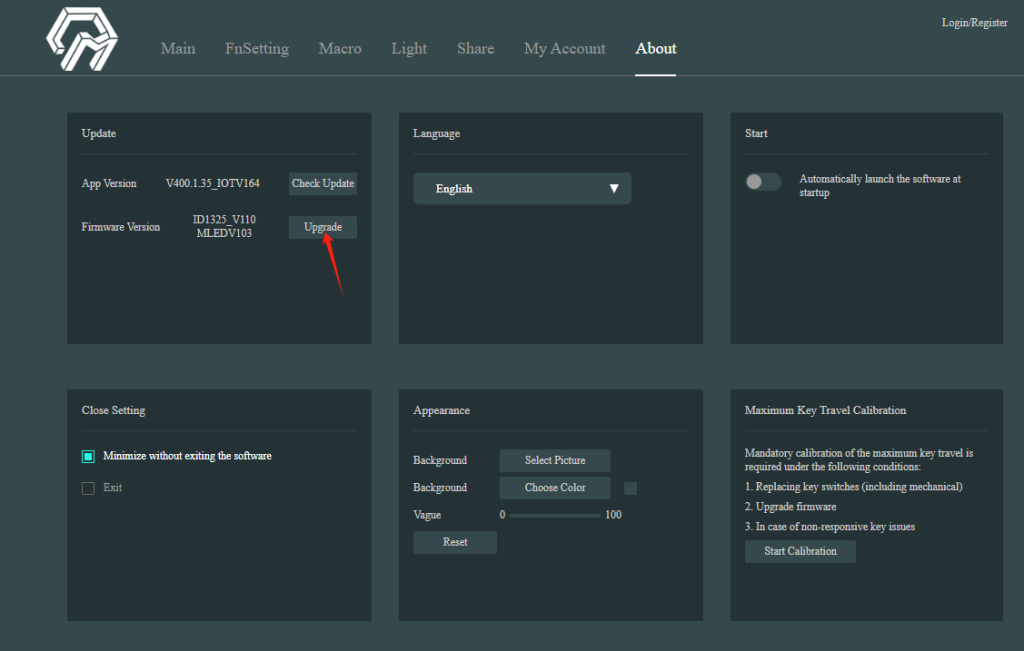
When you receive your MonsGeek HE keyboard, it’s essential to upgrade the firmware and calibrate the keyboard. Please follow the steps below:
1. Download the Latest Driver and Update Firmware:
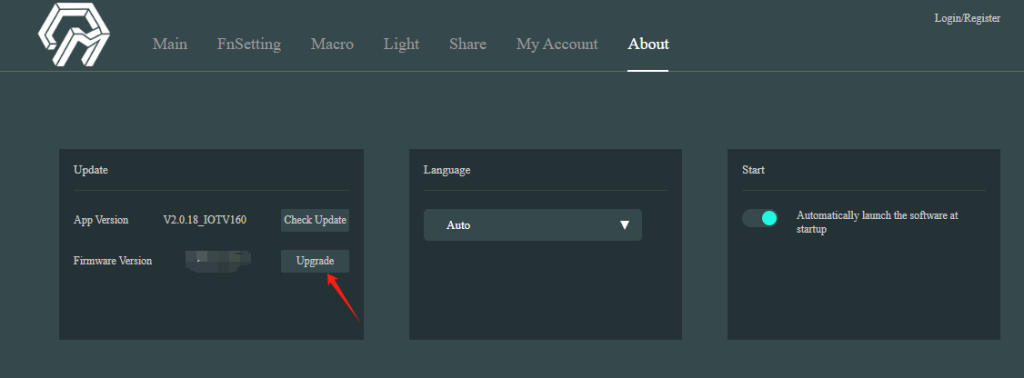
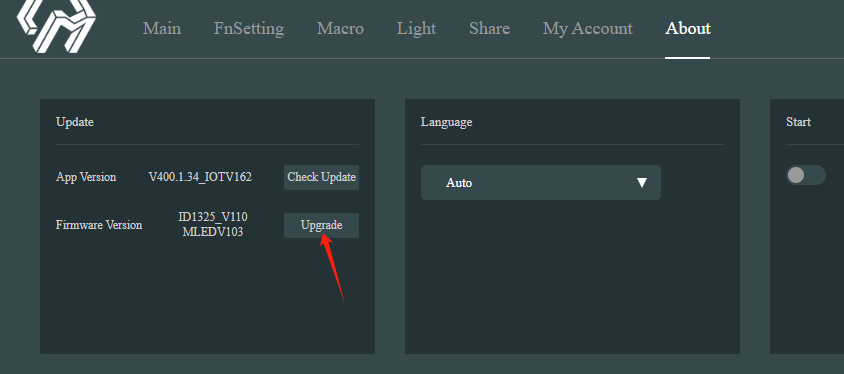
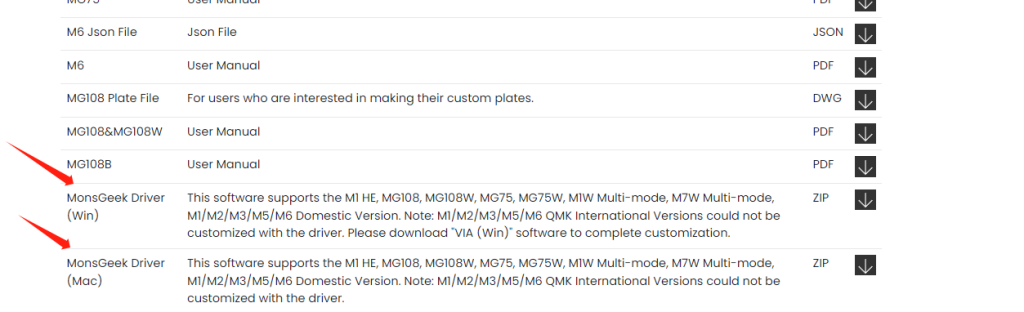
Ensure that your keyboard is running on the latest firmware version to experience its full potential. Outdated firmware, especially in Rapid Trigger (RT) modes, may cause typing issues. Download the latest MonsGeek Driver from our official download page and upgrade your firmware. MonsGeek download. You can find the Upgrade button on the About page in the Driver. Please don’t move the keyboard and mouse during the update.
2. Calibration:
Magnetic switch keyboards aim to provide a seamless typing experience. However, Hall sensors are sensitive to temperature variations, resulting in potentially significant changes to the magnetic field of the keyboard during transportation, influenced by temperature and environmental shifts (imagine shipping from California to Maine).
During this calibration, users should apply regular, moderate force while pressing the keys, and make sure to bottom out. However, please avoid pressing too hard during calibration, as excessive bottom-out force might lead to unresponsive keys at a large actuation distance (say, 3.5~3.8mm). Follow the steps below to calibrate the keyboard:
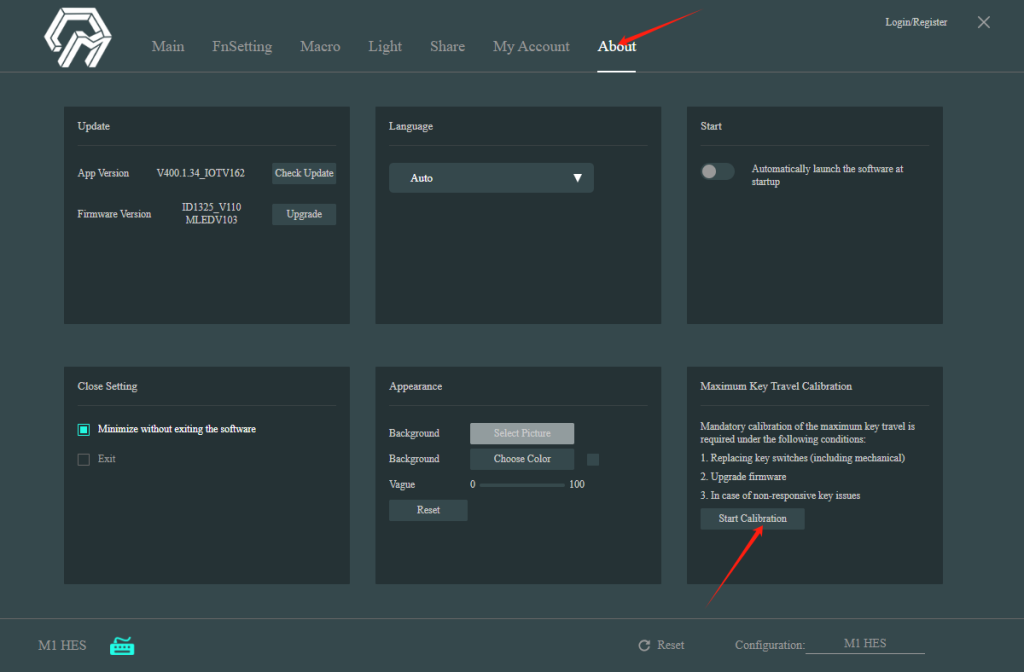
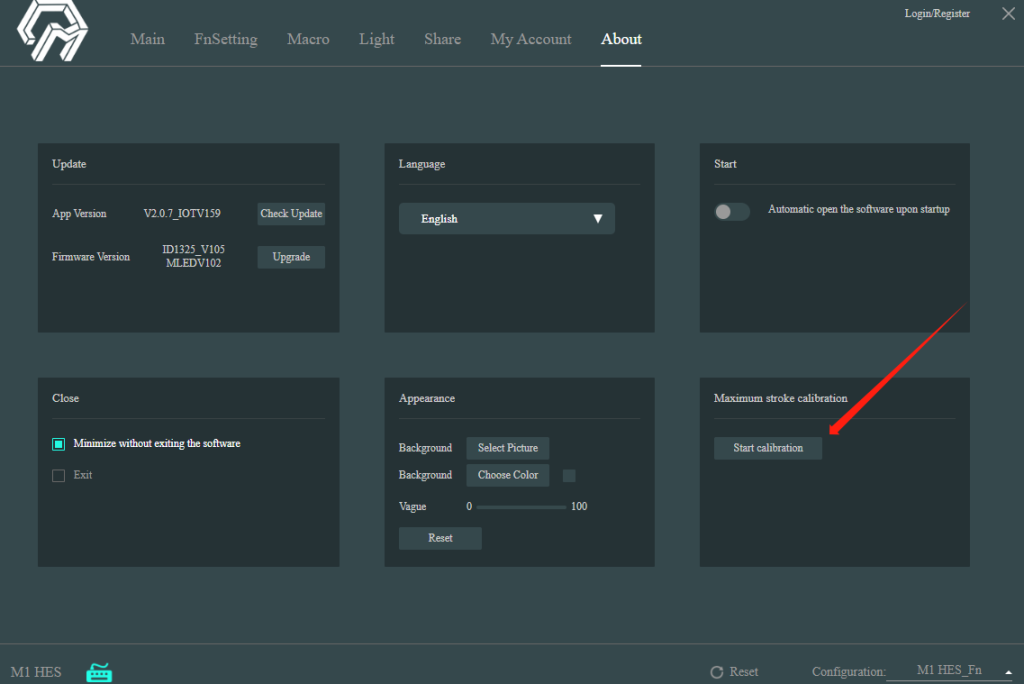
a. You can find the calibration button on the About page in MonsGeek Driver. Follow the steps on the screen to complete the calibration.
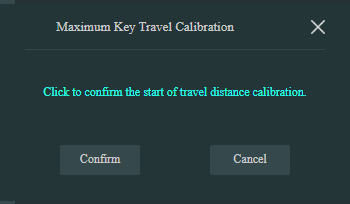
b. Press confirm to start.
c. During calibration, press each key to its lowest point with a similar force. Ensure that every key is pressed and released during this step. Press the “Confirm” button after completing this calibration.

d. If any keys still do not function correctly, it indicates that they may not have been pressed completely during calibration. In such cases, repeat the calibration process to ensure that all keys are functioning as expected.
MonsGeek Magnetic Switches keyboards are designed to support downward-facing S-pole magnetic switches. If you intend to use switches from other brands, please be aware that some may have additional legs that need to be cut. It’s crucial to consider the structure of the magnet; for instance, a vertical magnet might not be compatible with a PCB that supports only horizontal magnets.
Moreover, Some MonsGeek magnetic switch keyboards also offer support for 3-pin mechanical switches. However, after replacing with mechanical switches, it is essential to calibrate the maximum travel. You can find this calibration option on the “About” page in the driver software. Please find more details here: When and How to Calibrate MonsGeek Magnetic Switch Keyboard
These steps are specific to the M1 HES keyboard. Applying them to other keyboards may lead to bricking. Please follow these instructions:
1. Flash Separate LEDV103 Firmware:
It is recommended to flash the separate LEDV103 firmware available at [LEDV103 Firmware].
– Download all files from the provided link.
– Execute `royuan_tool.exe` to initiate the upgrade.
– Ensure your keyboard and mouse remain stationary during the update.
2. Manual Firmware Reversion and Upgrade:
If the LEDV103 update fails, consider using the manual firmware updater to revert to v104. Then, utilize the MonsGeek Driver to upgrade the firmware to v105. Access the manual firmware updater at [Firmware Reversion and Upgrade].
3. Further Assistance:
If the issue persists or you encounter difficulties, please reach out to support@monsgeek.com for dedicated support.
- Update Firmware: The firmware for magnetic switch keyboards is continually evolving. It’s crucial to use the latest firmware to ensure optimal performance. Outdated firmware, especially in Rapid Trigger (RT) modes, may lead to typing issues. Upgrade your firmware using the latest MonsGeek Driver, which you can download from our official download page. MonsGeek download
- Recalibration: If certain keys exhibit unresponsiveness or inconsistency, recalibration can often resolve these issues. Follow these steps:
- Access the calibration button on the About page in the MonsGeek Driver. Apply regular, moderate force while pressing each key during calibration. Avoid excessive force to prevent lost connections when keys bottom out. Press “Confirm” to initiate the calibration process. Press each key to its lowest point during calibration, ensuring every key is pressed and released. After completing the calibration, press “Confirm.”
- If any keys still don’t function correctly, it indicates incomplete calibration. Repeat the process to ensure all keys work as expected.
Please find more details here:https://www.monsgeek.com/faq/when-and-how-to-calibrate-monsgeek-magnetic-switch-keyboard-a-critical-guide/

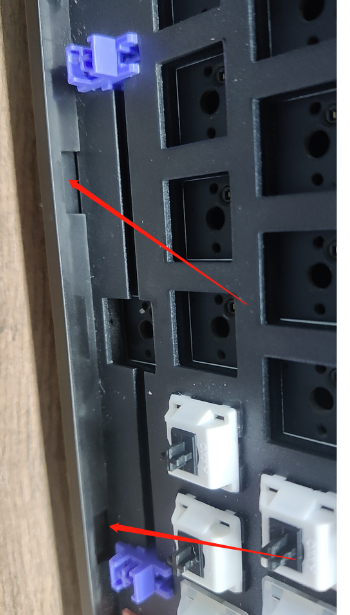
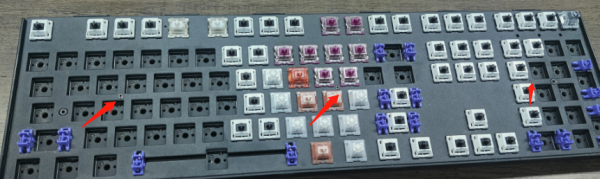
The M1 plate’s design, particularly in POM and FR4 variants, lacks screw holes necessary for attachment to PCBs. These plates rely on the switches themselves to hold them in place. When switches are mounted, the plate secures them with a snap, and the sockets clip the switch pins, providing stability.
Notably, magnetic switches have no pins. To improve stability, it is recommended to use multiple mechanical switches to secure both the perimeter and center of the plate if you want to use a plate without screws.
Remember, calibration is crucial after installing mechanical switches. Refer to this link for detailed instructions: Calibrating MonsGeek Magnetic Switch Keyboard.
Calibration plays a pivotal role in ensuring the optimal performance of magnetic switch keyboards. Its primary purpose is to eliminate the possibility of dead zones, where certain keys become unresponsive. Here’s a comprehensive guide on when and how to calibrate your magnetic switch keyboard:
1. Why Calibration Matters:
Magnetic switch keyboards aim to provide a seamless typing experience. However, Hall sensors are sensitive to temperature variations, resulting in potentially significant changes to the magnetic field of the keyboard during transportation, influenced by temperature and environmental shifts (imagine shipping from California to Maine).
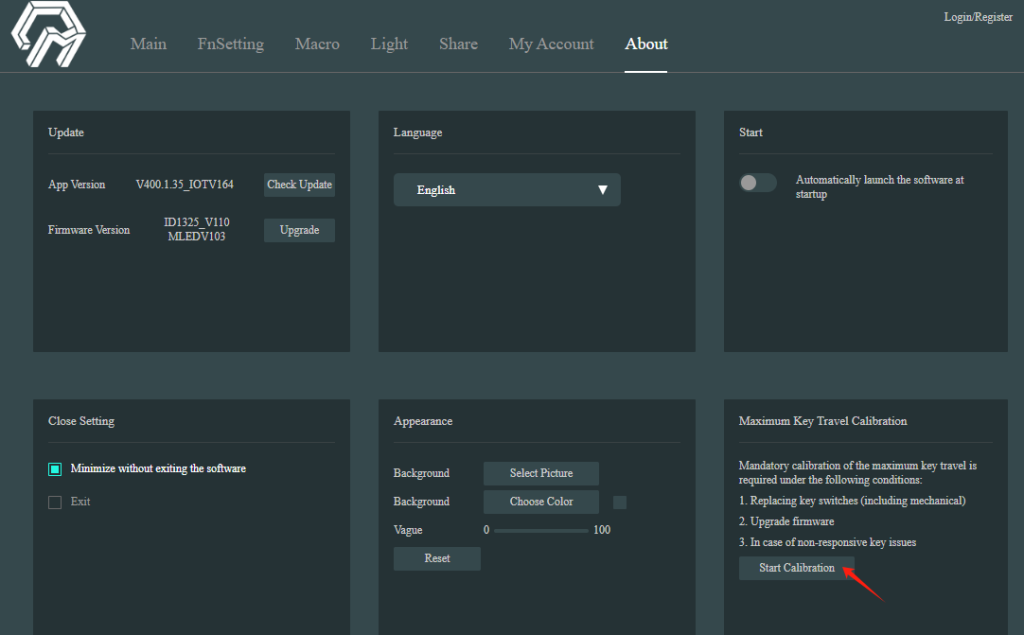
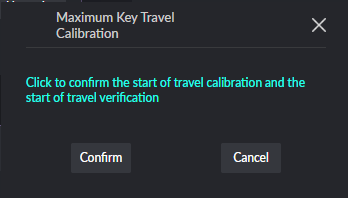
To optimize your typing experience, we recommend promptly upgrading to the latest firmware upon receiving the keyboard. Additionally, manually calibrate the keyboard through ‘About – Maximum Key Travel Calibration – Start Calibration’ by gently pressing every key.
2. Maximum Key Travel Calibration:
You can find the calibration button on the About page below in the Driver. Follow the steps on the screen to complete the calibration.
During this calibration, users should apply regular, moderate force while pressing the keys. Avoid pushing too hard during calibration, as excessive force might lead to lost connections when the keys bottom out.
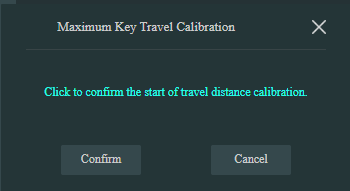
Press confirm to start.
During calibration, press each key to its lowest point with a similar force. Ensure that every key is pressed and released during this step. Press the “Confirm” button after completing this calibration.

If any keys still do not function correctly, it indicates that they may not have been pressed completely during calibration. In such cases, repeat the calibration process to ensure that all keys are functioning as expected.
3. Scenarios Requiring Calibration:
Calibration is not a routine task, but it’s necessary in various situations:
- Unresponsiveness: When certain keys become unresponsive or inconsistent, recalibration can resolve these issues.
- Before Performing Rapid Trigger: If you intend to use rapid trigger actions, it’s crucial to calibrate your keyboard. Failing to do so might result in unresponsiveness at specific keypress depths.
- New Features Added: Whenever new features or capabilities are introduced, it’s advisable to recalibrate to ensure the keyboard adapts appropriately.
- Replacing Switches: When switching between same-polarity magnetic switches and 3-pin mechanical switches, calibration is necessary to optimize performance.
In conclusion, calibration isn’t merely a routine task but a strategic move to maintain your magnetic switch keyboard’s reliability and responsiveness. By following these calibration guidelines, you can ensure a seamless typing experience and resolve potential unresponsiveness issues. For any specific concerns or further assistance, don’t hesitate to reach out to our dedicated support team.
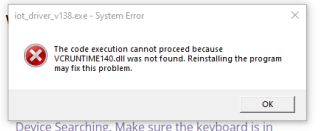
If you’ve encountered the error message “The code execution cannot proceed because VCRUNTIME140.dll was not found. Reinstalling the program may fix this problem” during the MonsGeek Cloud Driver installation, you can follow the steps below to address this issue. However, please be aware that there might be additional missing files not covered by these steps.
- Install Microsoft Visual C++ Redistributable: The VCRUNTIME140.dll file is part of the Visual C++ Redistributable package. Visit the Microsoft website and download the appropriate version of the Visual C++ Redistributable that matches your system. https://learn.microsoft.com/en-us/cpp/windows/latest-supported-vc-redist?view=msvc-170
- Run the Installer: Once the download is complete, run the installer and follow the on-screen instructions to install the Visual C++ Redistributable package.
- Restart Your Computer: After the installation is finished, restart your computer to ensure that the changes take effect.
- Check the Program: Launch the program that was displaying the error message and verify if the issue is resolved. If the error persists, consider reinstalling the program.
- Reinstall the Program: If the error remains even after reinstallation, uninstall the program that is triggering the error. Then, download the latest version from the official website and install it.
It’s important to note that while these steps often resolve the issue, they may not guarantee a complete solution, as other factors could be at play. If possible, trying the MonsGeek Cloud Driver on another computer might provide additional insights into the problem.
1. Turn the power ON switch, make sure that the keyboard is fully charged (see indicator LED), and check to see if 2.4G mode is working, if it works, long press the left Win + right Win for 5 seconds to reset the device and try again.
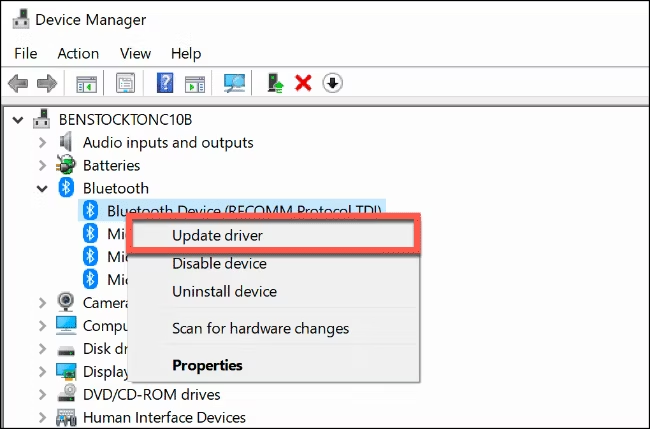
2. if the Bluetooth still can not connect at all: Power the keyboard on and off, check whether the Bluetooth driver is the latest version, and upgrade, after upgrading, turn off the Bluetooth mode on the computer, and then turn it on again. Make sure the distance between the computer and the wireless keyboard is within 10 meters, and try to connect again.
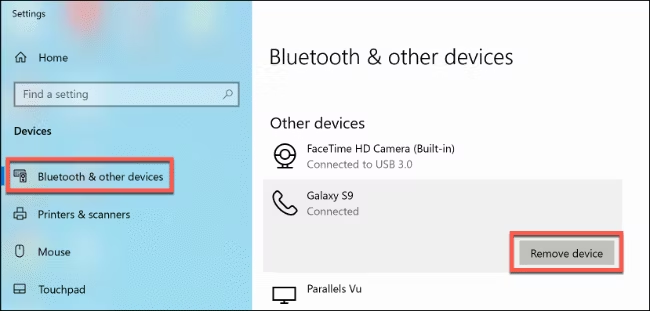
3. You can remove the saved Bluetooth device record from Windows, and then re-add the device through Bluetooth.
4. Windows system: please run the Bluetooth troubleshooter and try connecting again. It is recommended to try to use a Bluetooth 5.0 adapter on the computer to ensure a more stable connection. To run Windows Troubleshooter, right-click the Start menu and select “Settings.” From there, go to Update and Security > Troubleshoot > Bluetooth, and then click “Run the Troubleshooter.”
If you’re interested in expanding your M1 QMK’s capabilities with additional QMK lighting modes, you can access the specific Bin file and JSON file created by Paul Robinson( A friendly and talented custom keyboard player).
To complete the update, you can find the BIN files needed for this process from this link: BIN FILE LINK. Flashing the BIN file is a straightforward procedure; you can follow the steps outlined in this link.
You can download the corresponding json file from this link to the GitHub repository: Custom VIA/MonsGeek Repository. You need to load the corresponding json file to let the kit be detected by VIA. You can find how to connect your kit to VIA from HERE.
Remember, it’s essential to exercise caution and ensure a stable connection during the firmware update. Any potential issues or bricked keyboards resulting from firmware flashing are not covered by the warranty. Hence, be diligent during the upgrade process. If you ever need to revert to the original firmware, you can locate the original M1 BIN file by clicking HERE.
If you’re interested in expanding your M5 QMK’s capabilities with additional QMK lighting modes, you can access the specific Bin file and JSON file created by Paul Robinson( A friendly and talented custom keyboard player).
To complete the update, you can find the BIN files needed for this process from this link: BIN FILE LINK. Flashing the BIN file is a straightforward procedure; you can follow the steps outlined in this link. You can download the corresponding json file from this link to the GitHub repository: Custom VIA/MonsGeek Repository. You need to load the corresponding json file to let the kit be detected by VIA. You can find how to connect your kit to VIA from HERE.
Remember, it’s essential to exercise caution and ensure a stable connection during the firmware update. Any potential issues or bricked keyboards resulting from firmware flashing are not covered by the warranty. Hence, be diligent during the upgrade process. If you ever need to revert to the original firmware, you can locate the original M5 BIN file by clicking HERE.
The MonsGeek Magnetic Switch Keyboards offer four distinct modes in their stroke settings, each catering to different preferences and applications:
1. Comfort Mode: This mode closely resembles traditional mechanical switches. It features a 2mm actuation point and a 2mm reset point, making it ideal for standard typing and work tasks.
2. Sensitive Mode: In this mode, the actuation point is reduced to 0.5mm, while the reset point remains at 2mm. This configuration is designed for users who require fast key triggers and responses.
3. Game Mode: Game Mode unleashes the power of Rapid Trigger (RT). In this mode, the fixed actuation and reset points are eliminated, allowing the switches to respond instantly to even the slightest downward and upward pressure. It’s perfect for gamers who demand the utmost in responsiveness.
4. Customize Mode: In Customize Mode, you have the freedom to modify the behavior of any key to suit your preferences. This mode provides a high degree of personalization, allowing you to tailor the keyboard to your specific needs and workflow.
These distinct modes ensure that your MonsGeek Magnetic Switch Keyboard can be fine-tuned to meet your precise requirements, whether you’re typing, working, or gaming.
Rapid Trigger (RT) is an innovative feature that amplifies the capabilities of magnetic switches, offering significant benefits to gamers. When RT is enabled, the fixed actuation points and reset points traditionally associated with switches are eliminated.
With RT active, the magnetic switches respond to even the slightest downward and upward pressure. This means that triggers and resets occur almost instantaneously, unaffected by any keystroke-related latency factors. The result is an ultra-responsive gaming experience that aligns perfectly with the swift and precise actions demanded by certain games.
RT’s impact is most pronounced in first-person shooter (FPS) games, where split-second reactions and precise shooting are critical. It also enhances performance in rhythm games like OSU and games that rely on WASD movement, delivering a competitive edge by reducing input delays and ensuring your in-game actions match your intentions with remarkable precision.
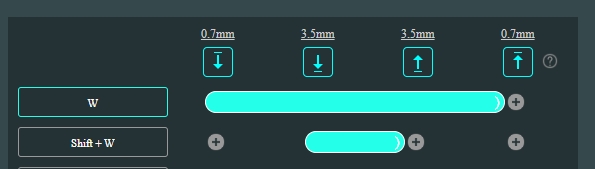
DKS, which stands for Dynamic Keystroke, is a powerful feature within the MonsGeek driver that empowers you to control various actions associated with a single key. With DKS, you can execute up to four distinct actions using a combination of individual actions and key combinations.
The DKS interface is organized into columns representing different key states:
- The first column activates when the key is initially pressed at 0.7 mm. (you can change the number by pressing it)
- The second column corresponds to the key’s lowest actuation point at 3.5 mm.
- The third column activates when the key returns to its resting position at approximately 3.5 mm.
- The fourth column is triggered when the key reaches its highest actuation point at 0.7 mm.
These four rows signify the actions that can be bound to DKS, allowing you to incorporate up to four different actions into a single key. To assign an action, simply click on an input box and press the key you want to associate it with.
For precise control, you can click on the “+” icons within the grid to create actions with specific keys at distinct points in the key’s travel. Each action will be executed once. To create a key “hold” effect, drag the circle between two or more points. The key will remain continuously pressed between those points. You can cancel the actuation point by clicking + again.
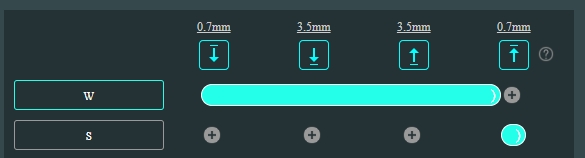
In gaming scenarios, DKS can simulate various movement speeds. For instance, certain games have multiple movement modes, such as slow, normal, or sprint. DKS enables you to create bindings that switch between these movements with a single key press.
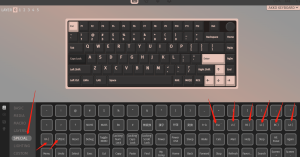
As the figure below, pressing the key partially could trigger a normal movement, while pressing it fully initiates a different movement, which stands for silent walking in some games, in others for sprinting.
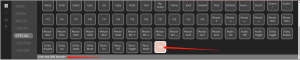
Or you can set up movement like below which can help counteract inertia for a quick stop when you release to a specific point in some games.
Please note that you need to calibrate the keyboard after you replace the mechanical switches. Please follow the steps below:
1. Open the latest MonsGeek Cloud Driver, available for download on the official MonsGeek Download page.
2. Navigate to the “About” page within the driver software. Locate and click the calibration button, which is clearly marked.
3. Press confirm to start.
4. Begin the calibration process by pressing each key to its lowest point. It’s crucial to ensure that every key is pressed and released during this step. Press the “Confirm” button after completing this calibration.
5. If any keys still do not function correctly, it indicates that they may not have been pressed completely during calibration. In such cases, repeat the calibration process to ensure that all keys are functioning as expected.
6. Travel Distance Calibration for the rest magnetic switches (If you still have magnetic switches on your keyboard.)
You can find the button on the Main- StrokeSetting Page below in the Driver. You don’t need to do anything during the calibration. Don’t use the keyboard before calibration ends.
This step ensures that the keyboard functions optimally. It’s particularly essential when dealing with rapid trigger actions, as without calibration, magnetic keys might not register at distances of 0.2 to 0.3mm.
To discern the disparities between magnetic switches and mechanical switches, consider the following aspects:
- Structural Distinctions: Magnetic switches rely on permanent magnets and springs, activated by sensing magnetic flux changes. On the other hand, mechanical switches employ metal shrapnel and springs, actuated by pressing metal sheet contacts.
- Customization of Actuation Points: Magnetic switches offer the ability to customize the actuation point and reset point for each key. In contrast, mechanical switches have fixed trigger points and reset points that cannot be adjusted.
- Gaming Benefits: Thanks to adjustable actuation points, Magnetic Switches can support features like Dynamic Keystroke(DKS) and Rapid Trigger (RT), enabling faster in-game actions. In contrast, mechanical switches have evolved to provide different superior sound or tactile feedback, making them a more suitable choice for office use.
In essence, magnetic switches offer flexibility for gaming enthusiasts who desire precise control, while mechanical switches focus on providing an enhanced typing experience for office and general use. Understanding these differences will help you choose the switch type that best suits your specific needs.
Disassembling the MonsGeek MG108W kit is a delicate procedure that requires care and attention to detail. Please keep in mind that any damage resulting from improper disassembly is not covered by the warranty. For warranty details, you can refer to our warranty policy.
It’s important to note that opening the top cover of the MG108W keyboard is not recommended unless you have the necessary specialized tools. If you decide to proceed with disassembly, follow these steps carefully:

1 First you need to pry off the top and bottom covers, you will need a pry bar. Removing the keycaps will be a better operation. There are a number of small openings in the seams of the top and bottom covers on the front (two on each side and six underneath), insert the pry bar into them and lift up to separate the clips. You’ll hear a snapping sound. The top snap will be easier to separate with a pry bar inserted into the seam from the back panel.
2 Locate and remove the three screws securing the plate. Carefully separate the plate from the bottom case.
- Initiate the troubleshooting process by quickly pressing Fn + Y, which activates the keyboard’s 2.4G mode. You’ll notice the Y key’s LED flashing slowly, confirming you’re in the correct mode.
- Next, for pairing, press and hold the FN+Y combination key for 3 seconds. This action triggers pairing mode. Simultaneously, insert the receiver/dongle. The Y keys’ LEDs will flash rapidly during this process. When the pairing is successful, the LED indicator will remain illuminated for 2 seconds.
- If your device isn’t detected within 30 seconds, the LED indicator will turn off, and the keyboard will enter sleep mode. In such cases, repeat steps 1 and 2 until the pairing is successful.
To resolve Bluetooth connectivity problems with your MonsGeek wireless keyboard, follow these steps:
- Initiate Bluetooth Mode:
- Begin by performing a short press of the Fn + E/R/T keys. This action activates Bluetooth mode. You’ll recognize it when you observe a slow, rhythmic LED flashing beneath the E/R/T keys.
- Enable Bluetooth Pairing:
- Now, press and hold the Fn + E/R/T keys for a duration of 3-5 seconds. This step activates Bluetooth pairing mode, which is indicated by rapid LED flashes beneath the E/R/T keys. For better visibility during this process, you can turn off the RGB lighting by pressing Fn + L.
- Locate the Keyboard:
- On your PC or phone, navigate to the “add Bluetooth device list” in your Bluetooth settings.
- Please be aware that all our Bluetooth keyboards support BT5.0 and are backward compatible with BT3.0. When you initiate pairing by pressing Fn + E/R/T, you will encounter two options: “Model BT1/2/3” and “Model BT3.0.”
- If your device supports BT5.0, select “Model BT1/2/3,” which corresponds to BT5.0 for optimal compatibility.
By following these steps, you can effectively troubleshoot and establish a Bluetooth connection for your MonsGeek wireless keyboard.
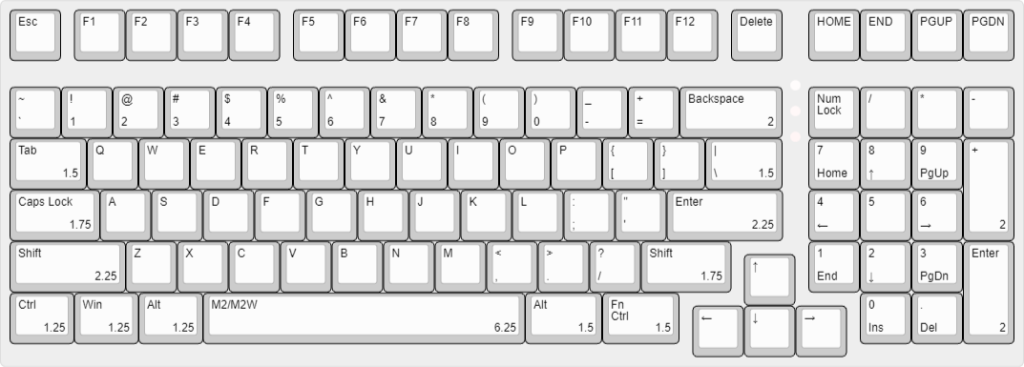
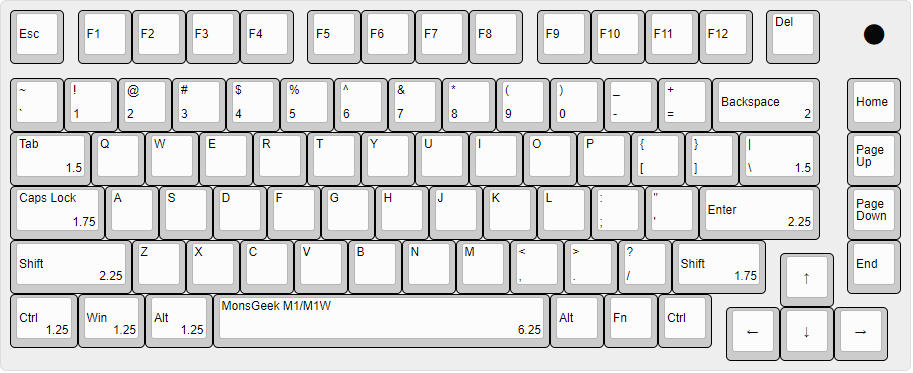
The keycap sizes of MonsGeek M1/M1W(ANSI) are as below. The remaining unlabeled keycaps are 1U.
Try online VIA: https://via.evove.top/ or https://usevia.app/
- Please use the right V3 .JSON file for the M3 QMK without needing to toggle V2 definitions. Here is the link: https://monsgeek.com/files/M3%20Json%20File_V3.json
- Load V3 JSON File: Load the corresponding V3 JSON file for your QMK keyboard. Ensure that the “Use V2 definitions” option is turned off when loading the V3 JSON file. You may need to load 2-3 times to let your keyboard be detected.
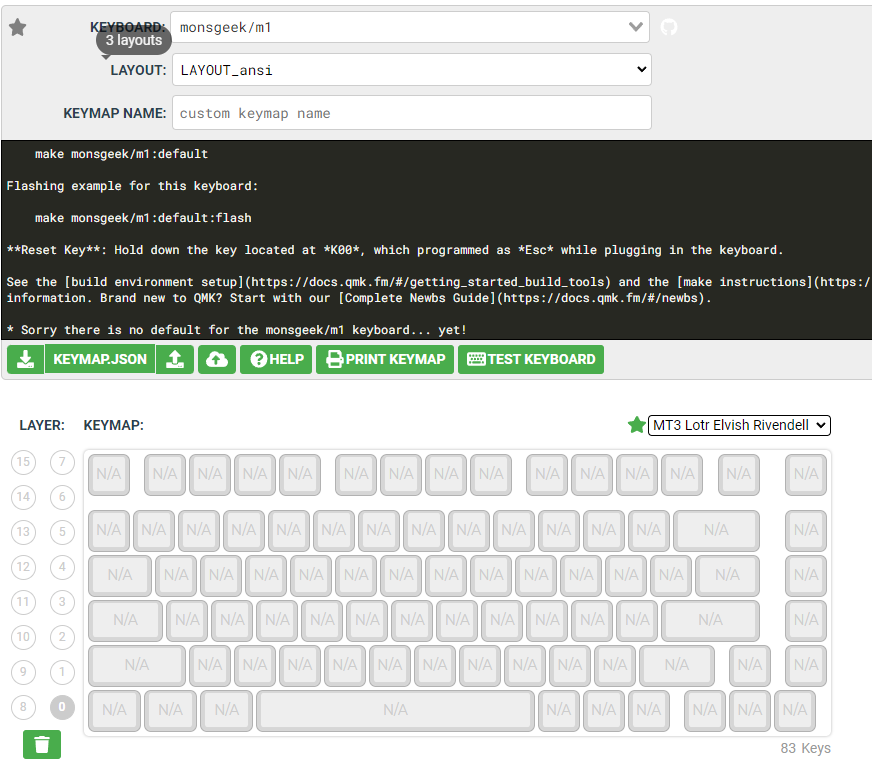
Step 1: Select Your Keyboard: Open the QMK Configurator website at https://config.qmk.fm/#/monsgeek/m1/LAYOUT_ansi.You can find M5 in the list too.
Step 2: Select Your Keyboard Layout: If there is only one layout available, you don’t need to change anything. You could choose ANSI or ISO depending on your keyboard’s layout.
Step 3: Name Your Keymap: Give your keymap a name. If you encounter issues during compilation, consider changing the name to avoid conflicts with existing keymaps in the QMK Firmware repository.
Step 4: Define Your Keymap:
You can enter keycodes in one of three ways:
- Drag and drop the keycodes onto the layout.
- Click on an empty spot on the layout, then select the desired keycode.
- Click on an empty spot on the layout, then press the physical key on your keyboard to assign a keycode.
Hover your mouse over a key to see a short description of the key code. For more detailed information, refer to the Basic Keycode Reference and Advanced Keycode Reference.
If your selected layout doesn’t match your physical build, leave the unused keys blank. If you’re unsure which key is in use, for example, if you have a single backspace key but the LAYOUT_all has 2 keys for backspace, put the same keycode in both locations.
Step 5: Save Your Keymap for Future Changes: Once you’re satisfied with your keymap or want to work on it later, press the “Download this QMK Keymap JSON File” button. This will save your keymap to your computer. You can load this .json file in the future by pressing the “Upload a QMK Keymap JSON File” button.
CAUTION: Note that the .json file used here is not the same as the one used for other tools like kbfirmware.com. Using this file with other tools or vice versa may cause issues.
Step 6: Compile Your Firmware File Press the green “Compile” button. Once the compilation is complete, you can download the firmware file by clicking the green “Download Firmware” button.
Next Steps: Flashing Your Keyboard After downloading the firmware file, you’ll need to flash it onto your keyboard. For detailed instructions on flashing your keyboard with the new firmware, refer to the article provided in the link.
There are several common layer-switching keys:
- Mo(n): This function momentarily activates a layer. When you release the key, the layer is deactivated. This function is commonly assigned to the Fn key on our keyboards.
- TG(n): This function toggles the nth layer on and off. It activates the layer if it’s inactive and deactivates it if it’s active. You can think of it as similar to the num lock function. On our keyboards, this function is also used to implement Fn+W.
- DF(n): This function switches the default layer. The default layer is the base layer that is always active, and other layers stack on top of it. It can be used to switch from one layout (e.g., QWERTY) to another. It’s important to note that this is a temporary switch that only persists until the keyboard loses power. Modifying the default layer in a persistent way requires deeper customization.
- LT(n, kc): We will talk about this way later in this article.
To configure tap/hold keys in VIA, you have a few options:
- In VIA, you can find some pre-defined tap/hold keys such as ESC`, LS(, RS), LC(, RC), LA(, RA), and SftEnt. Simply hover your cursor over the key to see the code and its meaning.
- You can use the “ANY” key to program any QMK code. To do this, refer to this link: [LINK].
For example, you can use the code “LT(layer, kc)” to “Turn on a layer when held, and activate the key code ‘kc’ when tapped.” For instance, “LT(2, KC_SPC)” will activate layer 2 when held, and input a spacebar when tapped.
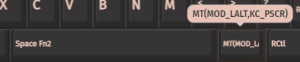
Another code option is “MT(mod, kc)”, which means activating a modifier key (Shift, Ctrl, Alt, Gui) when held and the key code ‘kc’ when tapped.”MT(MOD_LALT, KC_PSCR)” will act as LALT when held, and act as Printscreen when tapped.
You can find more code examples for tap/hold keys in the provided link.
M Series Screws (M1/M2/M3/M5/M1W)
- Lock Upper and Low Cover
Allen Bolt: PM2.5*20mm
Allen Bolt: PM2.5*6mm
- Lock JST Cable
PWM2.0*6mm
- Lock PCB Board and Plate
PWA2.0*4mm
Kindly note: The previous version of M2 used machine screws to secure the PCB board and plate. However, it has now been upgraded to tapping screws, which are also used in other M series models.
If you are experiencing issues with the Fn key on your keyboard, please try the following steps to troubleshoot the problem:
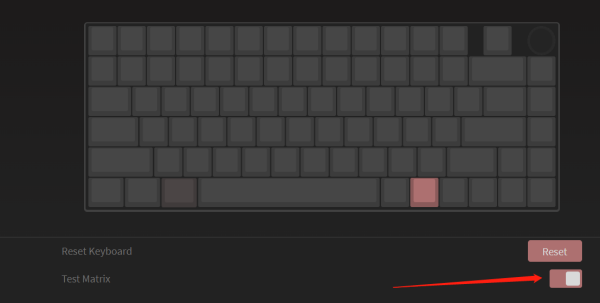
- Test with “Test Matrix” ON or Hotkeys: Most key testers cannot detect the Fn key, but you can test it by enabling the “Test Matrix” feature in VIA if your keyboard supports VIA. This feature allows you to check the functionality of each key individually. Alternatively, you can try using the Fn+L combination to open/close the RGB settings and test if the Fn key is responsive.
- Restore factory settings: In the keyboard driver or by following the instructions in the manual, try restoring the keyboard to its factory settings. This can often resolve software-related issues. For QMK version keyboards, you can perform a reset by holding down the Esc key while plugging in the keyboard. Afterward, reconnect the keyboard to complete the reset process.
- Check for additional troubleshooting: If the Fn key still does not work after the reset, you can refer to the following article for further guidance: Link to the article on fixing keyboard issues.
If you are experiencing issues with certain keys not functioning on your keyboard, please try the following steps to troubleshoot the problem:
- Restore factory settings: In the keyboard driver or by following the instructions in the manual, try restoring the keyboard to its factory settings. This can often resolve software-related issues. For QMK version keyboards, hold down Esc while plugging in the keyboard to perform a reset. Afterward, reconnect the keyboard to complete the reset process.
- Switch replacement: If the issue persists, consider replacing the switch associated with the malfunctioning key. You can use a good switch from the keyboard to replace the defective one. Please refer to the manual or follow the provided instructions for guidance on how to swap the switch. Swap the switch. If needed, you can use tweezers or a switch puller for the replacement. After replacing the switch, test the key to see if it works properly. If the key functions correctly with the new switch, it suggests that the issue was likely caused by the original switch.
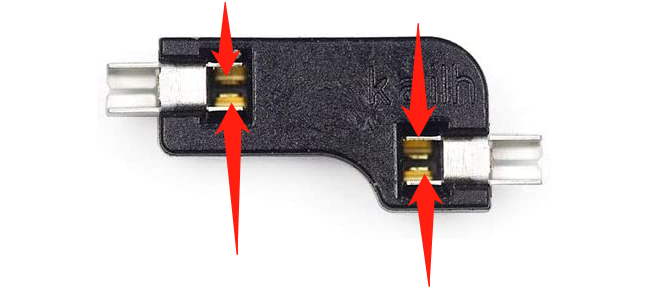
- Socket problem: If swapping switches does not resolve the problem, there may be an issue with the socket on the PCB (Printed Circuit Board). To further diagnose this, perform the following test:
- Use tweezers or a small piece of wire with good conduction.Follow the instructions in the provided link (https://drive.google.com/file/d/1w0-ANVMocShl13cze_3p2sBnQ7VhRRZB/view?usp=sharing) to perform the test.Use VIA or other keyboard testing software to check if the key registers properly.
- Fixing loose socket contacts: If there is a loose socket contact causing the issue, follow the steps below:
- Check the provided links for visual references on identifying and fixing the problem:
- Carefully disassemble the keyboard to access the PCB.
- Take caution when handling the PCB cable and JST connector, as they are fragile components.
- Follow the provided instructions and images to tighten the contacts in the socket to ensure proper circuit connection.
By following these steps and emphasizing important instructions, you can effectively troubleshoot and address the issue of non-functioning keys on your keyboard.
To identify whether your keyboard is the QMK version, we recommend following these steps:
- Locate the EAN number: Look for the EAN number on the outer box of your keyboard. It typically consists of a series of digits as below (697535138XXXX). The EAN number helps us verify the specific version of your keyboard.
- Contact our support team: Once you have found the EAN number, please reach out to our support team. You can contact us via support@monsgeek.com and provide the EAN number for reference. Our dedicated team will assist you in confirming whether your keyboard is the QMK version or not.
Please note that providing the EANU number helps us accurately identify the version of your keyboard and offer appropriate guidance. If you have any further questions or require assistance, please don’t hesitate to contact our support team.

The “No DFU capable USB device available” error commonly occurs when attempting to flash firmware using the QMK version. This error suggests that the file required for the driver installation might not have been installed properly. To troubleshoot and resolve this issue, please follow these steps:
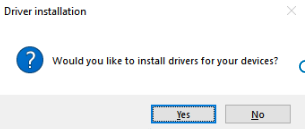
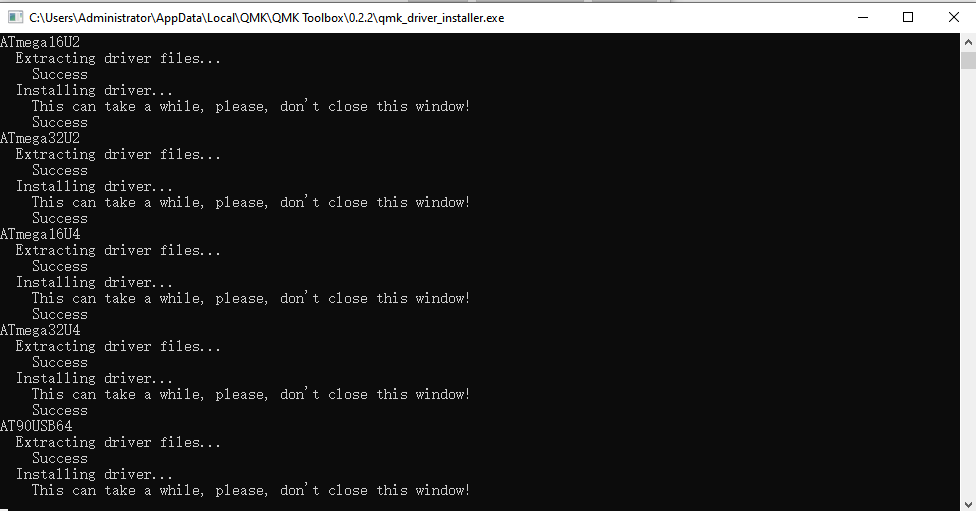
- Re-install the signed QMK toolbox: Signed QMK Tool. Once the download is complete, run the QMK Toolbox installation file (.exe) and follow the on-screen instructions. During the installation process, make sure to press “Yes” when prompted to install the driver. It is crucial to be patient and wait until the driver installation is fully completed. Interrupting or closing the installation prematurely can lead to the “No DFU capable USB device available” error.
- If you continue to experience issues or have further questions, you need to install these drivers in order for QMK to detect the keyboard:https://github.com/WestberryTech/wb32-dfu-updater/tree/master/driver.
The original firmware: M1 QMK, M2 QMK, M3 QMK
To enter Bootloader mode and flash the firmware on your QMK version keyboard, please follow these steps:
- Download QMK Toolbox:You could download the QMK toolbox here:QMK toolbox.Or you could visit the QMK Toolbox download page at QMK Toolbox and download the software. If prompted, proceed with the installation process and wait for it to complete.
- Open QMK Toolbox: Launch the QMK Toolbox software on your computer. If it’s your first time using it, you may be prompted to install necessary drivers. Follow the on-screen instructions and wait until the installation is finished.
- Locate the firmware: Click the “Open” button in QMK Toolbox to browse and select the appropriate .bin firmware file for your keyboard model. Ensure you have downloaded the correct firmware version for your keyboard.
- Enter Bootloader mode: Disconnect the USB cable from your keyboard. While holding down the “ESC” key, reconnect the USB cable. You should notice the “Flash/Exit DFU” button in QMK Toolbox turn black, indicating that you are now in Bootloader mode.
- Flash the firmware: With your keyboard in Bootloader mode, click the “Flash” button in QMK Toolbox to begin the firmware flashing process. Wait until you see the “OK” message indicating that the firmware update is complete.
- Exit Bootloader mode: After the firmware has been successfully flashed, click the “Exit DFU” button in QMK Toolbox. You can then close the QMK Toolbox software.
- Reconnect the USB cable: Reconnect the USB cable to your keyboard. Your keyboard should now be ready for use with the updated firmware.
Please note that these instructions are specific to QMK version keyboards and assume you have already downloaded the necessary firmware. If you have any further questions or encounter any difficulties, feel free to seek additional support from the QMK community or consult support@monsgeek.com.
If you are unable to connect your keyboard to VIA, please follow these steps to troubleshoot the issue:
- Install the latest VIA version: Visit the VIA releases page at VIA releases and download the latest VIA software. Install it on your computer, ensuring you have the most up-to-date version.
- Reconnect the keyboard power cable: Disconnect and reconnect the power cable of your keyboard. This step helps to ensure a fresh connection between the keyboard and your computer.
- Load the JSON file: On the Design page of VIA, you might need to load a JSON file to configure your keyboard properly. You can download the JSON file from https://www.monsgeek.com/download/. Once downloaded, locate the load button on the Design tab and click it to load the JSON file.Note: If you can’t find the load button, make sure you have opened the Design tab in the VIA software.
- Reconnect the keyboard power cable (again): Disconnect and reconnect the power cable of your keyboard once more. This step ensures that the keyboard is properly recognized by the VIA software.
- Customize the keymap: Click on the “CONFIGURE” section in VIA to access keymap customization. Use this section to modify and configure the keymap according to your preferences.
If you continue to experience difficulties connecting your keyboard to VIA or encounter any other issues, it is advisable to seek further assistance from the VIA community or consult the manufacturer of your keyboard. They can provide specific guidance tailored to your keyboard model.

If you’re experiencing difficulty with your M2 (QMK version) keyboard not being recognized immediately upon booting up your PC, there are a few steps you can take to troubleshoot the problem:
- Update the firmware: It’s recommended to update the firmware of your M2 keyboard. You can download the firmware update from this Google Drive link: Firmware Update. Please note that this firmware update is only applicable for the M2 QMK version. If your keyboard is functioning properly, you may not need to perform this update.
- Firmware flashing instructions: Follow the provided instructions in the firmware update package to flash the updated firmware onto your M2 keyboard. This process helps to ensure the keyboard’s firmware is up-to-date and may help resolve the recognition issue.
- Check USB connection and port: Verify that the USB cable is securely connected to both the M2 keyboard and the computer. Additionally, try connecting the keyboard to a different USB port on your PC to see if the issue persists. Faulty USB cables or ports can sometimes cause recognition problems.
- Update USB drivers: Ensure that you have the latest USB drivers installed on your computer. Visit the manufacturer’s website for your PC or motherboard and look for any available USB driver updates. Installing the latest drivers can often resolve compatibility issues.
If the issue persists after trying these steps, it may be helpful to reach out to our support team for further assistance. They can provide additional guidance based on the specific model and configuration of your M2 keyboard.
Please keep in mind that firmware updates should be performed with caution and only when necessary. If your keyboard is working properly and recognized consistently, there may not be a need to flash the firmware.
It is most likely caused by an accidental lock of the Win key.
You could press Fn+Win to unlock the Win key.
Try online VIA: https://via.evove.top/ or https://usevia.app/
If it still cannot work, you may need to follow the steps below:
Firmware Upgrade from V2 to V3 definitions: Follow the steps outlined in the guide below.
- QMK Toolbox: Link
- Make sure the driver is installed completely when installing the Toolbox.

- Once you have successfully upgraded the firmware to V3, you can use the V3 .JSON file for the MonsGeek M1 without needing to toggle V2 definitions on. Here is the link: Link
- Load V3 JSON File: After updating the firmware and installing the drivers, load the corresponding V3 JSON file for your M1 QMK keyboard. Ensure that the “Use V2 definitions” option is turned off when loading the V3 JSON file.
Please be aware that the theoretical polling rate in wired mode is 1000Hz.
However, it’s important to note that the actual polling rate may be influenced by various factors in the keyboard’s usage environment. These factors include the speed at which you press the switches, the efficiency of data transmission, and the decoding time of the connected device. These variables can affect the overall performance and responsiveness of the keyboard.
You could download the latest VIA here.
You get a 3-day price guarantee for all keyboard purchases and qualified keycap sets over $50.
The price-matching policy for monsgeek.com is not applicable for other types of computer peripherals. For other accessories, the price may fluctuate in response to exchange rate and logistic rates.
The price-match guarantee, however, does NOT extend to price changes subject to holiday special events/deals. Requests of price-match on holiday deals will be declined.
Regarding price-matching policy for Monsgeek keyboards on other platform, please consult the distributor for more details.
To request price match, please message support@monsgeek.com with your order ID.
Akko × MonsGeek switches (including the Jelly lines) are compatible with Outemu mechanical sockets.
They are NOT compatible with Outemu optical sockets.
The short-answer is YES. And the VAT is collected at the time of checkout as required by EU Commission to comply with VAT e-commerce obligations.
MonsGeek provides the IOSS to the carrier to expedite the customs clearance process and report the VAT to the European Commission every month. By doing so, we are providing the information required for customs clearance upfront so there should be no delay for customs clearance.
PS: In rare cases, if you go with FedEx/TNT, the logistic carrier may neglect the IOSS and recharge you the VAT. In this case, contact support@monsgeek.com to get a refund for the VAT, or pay the VAT on your behalf.
Custom import taxes are not included in the payment and are generally not collected in most logistic routes we provide unless you go with the express shipment (like FedEx/TNT).
Below are the definitions of order status:
[Processing] Item not yet picked up by carrier (it takes around 3 working days for processing). Or maybe the package has been handed over to the carrier, but the carrier has not yet generated a label (could have 1-3 days delay) , especially for expedited shipping methods like DHL, FedEx, or UPS.
For pre-order items, it will remain as “processing” until the items are in stock and ready to be shipped.
[Shipped] MonsGeek has handed over the package to the carrier.
Once the shipping status changes to “shipped” and a tracking number has been entered, which means the package is handed over to the carrier.
There are typically two main reasons if the tracking information doesn’t update:
1.Initial Scan only available at final destination
Sometimes the package is carried by multiple carriers. So you will be having different tracking ID throughout the entire logistic network.
However, MonsGeek only enters the tracking ID for the LAST carrier.
For carriers like USPS, it will only be trackable once it reaches the destination sort facility.
The same situation includes, but not limited to Australia Post, DPD, DHL Paket (for EU countries), Canada Post and USPS.
Users will need to wait at least 7-15 days before the package is scanned locally with final destination carrier. And the package should then be delivered in a few days.
For example, if the package was handed over to carrier on August 1st through Australia Post, and it will take 10 days to reach Australia.
From August 1st – 10th, users will see “the electronic shipping info has been collected”.
And once the item reaches Australia, the initial scan of pick-up will then be displayed.
2. Limited Air Shipping Capacity
This happens frequently with DHL, where it could take up to a week for a specific package to successfully catch up the flight due to limited logistic capacity.
However, if the initial tracking of your package doesn’t take place for over 2 weeks after the tracking ID has been entered, please consult support@monsgeek.com to ensure there isn’t any issue.
List of Regions/Countries We Ship To (2024/7/8)
Contact support@monsgeek.com if yours is not listed. We will try our best to find reliable logistic partners to deliver to your country/region.
Argentina
Australia
Austria
Belgium
Brunei
Bulgaria
Canada
Chile
Colombia
Croatia
Czech Republic
Denmark
Estonia
Finland
France
Germany
Greece
Hong Kong
Hungary
Iceland
Indonesia
Ireland
Israel
Italy
Japan
Latvia
Lithuania
Luxembourg
Malaysia
Mexico
Netherlands
New Zealand
Norway
Philippines
Poland
Portugal
Qatar
Reunion
Romania
Russia
Saudi Arabia
Serbia
Singapore
Slovakia
Slovenia
South Africa
South Korea
Spain
Sweden
Switzerland
Taiwan
Thailand
Turkey.
United Arab Emirates
United Kingdom (UK)
United States (US)
Note: the date below represents BUSINESS DAYS.
It depended on the delivery region, the content of order as well as the delivery method.
For standard shipping, please check the general delivery speed below.
For paid priority shipping, we will ship with FedEx/DHL/UPS Intl’ Priority or TNT Express that shall take approximately 3~5 days to deliver.
For specific region, please consult support@monsgeek.com.
USA:
10~25 days (USPS)
3~12 days (FedEx/DHL/UPS with Priority Shipping; Local US Delivery through Chukou1)
Australia:
10~15 days (Australia Post)
3~10 days (FedEx/DHL/UPS with Priority Shipping)
UK:
5~9 days (Royal Mail/Yodel)
FR:
7~10 days(La Poste)
Malaysia
6~8 days (Airpak Express)
Germany
7~9 days (DHL Paket)
Philippines
3~7 days (FedEx)
You can change your shipping address by yourself as long as your order has not been placed.
Follow these steps to change the details of your order 1. Go to my orders. 2. Click on the edit details icon for the order which you’d like to update. 3. Update the required fields and click save changes. 4. Click done after you’ve finished.
If you have already placed your order, you should contact us to change your shipping address within 2 hours. Otherwise, there isn’t guaranteed that your change will take effect and if we were able to make necessary changes, extra fee might be imposed by the carrier that buyer needs to be responsible for.
The VAT is included but the import duty (customs tax) isn’t included, and customer is responsible for paying the import duty if being billed by the local customs.
For EU customers, please check this article.
For US customers, you should not worry about it as US only charges import tax for items over $800, way beyond the value of mechanical keyboards and parts.
For most other regions, if you go with the standard shipping option, the chance of being charged with import duty at customs is extremely low.
The following countries may have high chances of getting taxes and the associated shipping option:
Vietnam (please purchase through Akko VN);
Austria (with FedEx/DHL/UPS);
Indonesia (with FedEx/DHL/UPS);
Canada (with FedEx/DHL/UPS);
Colombia (with FedEx/DHL/UPS).
M1 has a non-QMK Chinese version sold on Taobao, JD and other platforms in China.
M1 global version (QMK supported) is sold on the following channels:
Official Website (Store): https://www.monsgeek.com/
Global Partners (Buy from Local): https://www.monsgeek.com/partner/
Akko German Store: https://akkogear.de/products/monsgeek-m1
Shopee PH Store: https://shopee.ph/monsgeek.ph
Shopee MY Store: https://shopee.com.my/monsgeek.my
Shopee SG Store: https://shopee.sg/monsgeek.sg
The currency of www.monsgeek.com is in USD.
M1 comes with polycarbonate plate.
You can purchase the following plate separately:
FR4;
POM;
Aluminum.
All offered at $9.99.
You can also use plate file to print your desired plate.