Frequently Asked Questions
Category
How to Recover an M1W VIA Keyboard After Flashing M1 V1 QMK Firmware or Other Wrong Firmware?
2024-10-30
Please be aware that different keyboards require specific firmware versions, and flashing an incorrect firmware can damage your keyboard and potentially void your warranty. The M1W VIA model uses distinct firmware that differs from the M1 QMK. Follow the steps below to recover your M1W VIA keyboard.
- Download the Correct Firmware
Download the appropriate firmware for M1W VIA from the following link: M1W VIA Firmware. Note: Before flashing, toggle the system switch located under the Caps Lock key to the Middle position. - Open QMK Toolbox
- Launch the QMK Toolbox software from the download file.
- If this is your first time using QMK Toolbox, follow the on-screen instructions to install any necessary drivers.
- Locate the Firmware
- In the QMK Toolbox, click the “Open” button to browse for the .bin firmware file you downloaded.
- Ensure that this firmware file matches your keyboard model.
- Enter Bootloader Mode
- Disconnect the USB cable from your keyboard.
- While holding down the ESC key, reconnect the USB cable.
- Confirm that the “Flash” button in QMK Toolbox is active (it should appear black), indicating the keyboard is in Bootloader mode.
Reminder: Ensure the system switch under Caps Lock is in the Middle while holding ESC and reconnecting the cable.
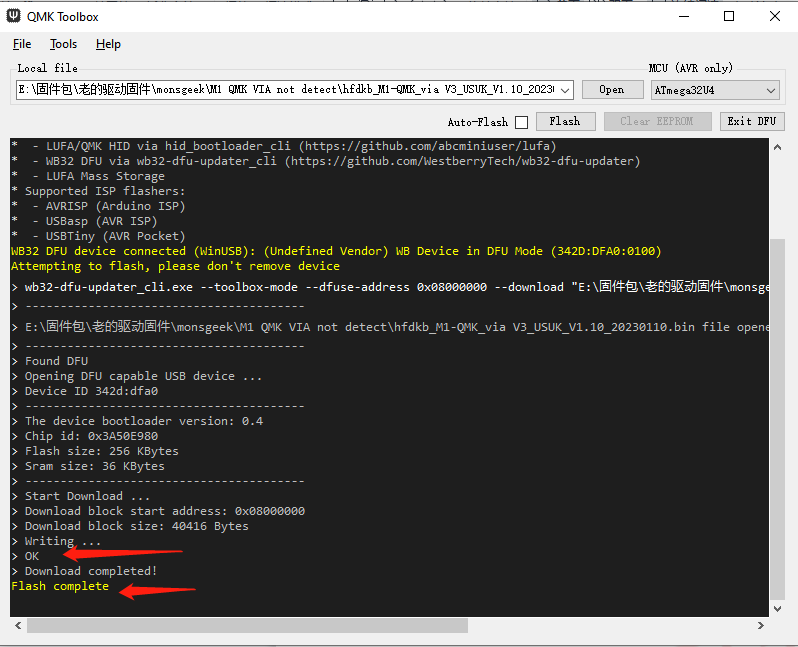
- Flash the Firmware
- In Bootloader mode, click the “Flash” button in QMK Toolbox to initiate the firmware update.
- Wait until the message “OK” appears, confirming the firmware update is complete.
- Exit Bootloader Mode
- After flashing, click the “Exit DFU” button in QMK Toolbox.
- You may then close the QMK Toolbox software.
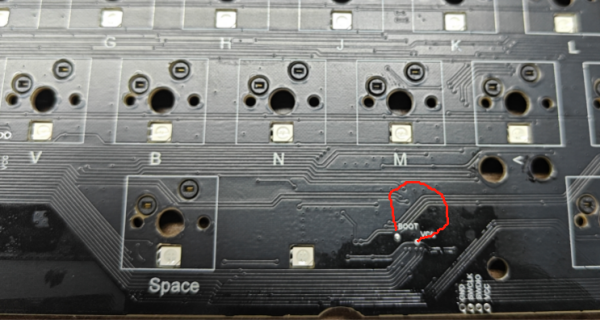
Please try the steps below to enter bootloader mode if the usual methods don’t work.You can find the pins below, please follow the steps below:
1. Toggle the system switch under the Caps Lock key to Middle.
2. Shorten the 2 pins below on the PCB and plug in the USB cable.
You need to disassemble the keyboard to locate the two pins. The only tools you’ll need are:
- A 2mm hex wrench
- A PH0 or PH1 Phillips screwdriver
- Pull out all the keycaps and switches with a keycap puller and a switch puller. You could plug out the switch like this: Swap the switch. Make sure to apply vertical force when pulling out and inserting the switch to prevent damage to the sockets.
- Unscrew the 6 screws on the lower case, then lift the top case. Make sure the screwdriver head is fully inserted before you start screwing.
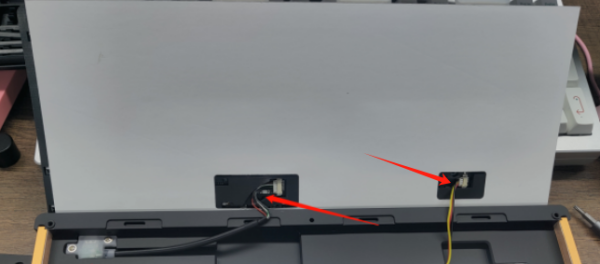
- Lift up the PCB board and you will find the JST cable and battery cable below. Pull out the cables carefully.
- Unscrew the screws on the PCB to separate the PCB and plate.